Appropriate eye and personal protective equipment must be worn. Machines have moving parts that may cause entanglement. All loose clothing, jewelry and long hair must be secured.
OPERATE ONLY AFTER YOU'VE RECIEVED INSTRUCTION & TEACHER'S PERMISSION TO USE THIS TOOL.
BE SURE YOUR TEACHER HAS CHECKED YOUR UNDERSTANDING OF PROPER PRACTICE.
OPERATE ONLY AFTER YOU'VE RECIEVED INSTRUCTION & TEACHER'S PERMISSION TO USE THIS TOOL.
BE SURE YOUR TEACHER HAS CHECKED YOUR UNDERSTANDING OF PROPER PRACTICE.
Drill Press

1. Be sure to have the instructor’s approval before operating the machine.
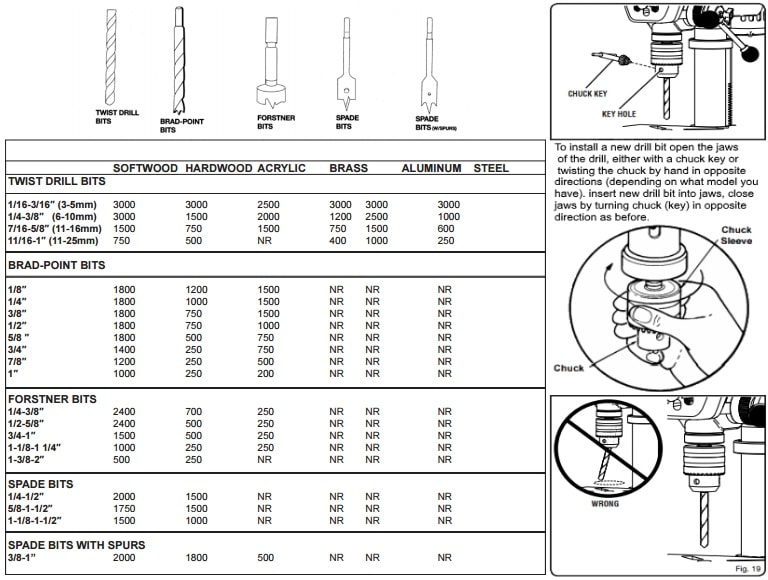
2. Check the speed setting to see that it is correct for your work. Holes over 1/2” inch should be bored at the lowest speed.
3. Use only an approved type of bit. Bits with feed screws or those with excessive length should not be used.
4. Mount the bit securely to the full depth of the chuck and in the center. Remove the key immediately.
5. Position the table and adjust the feed stroke so there is no chance of the bit hitting the table.
6. The work should be placed on a wood pad when the holes are drilled all the way through.
7. Work that will be held by hand should be center punched.
8. Small or irregular shaped pieces must be clamped to the table or be held in some special fixture.
9. Feed the bit smoothly into the work. When the hole is deep, withdraw it frequently to clear the shavings and cool the bit.
10. When using special clamping setups, or a hole saw or a fly cutter, have the instructor inspect it before turning it on.
11. Always have your instructor check setups for routing or shaping.
|
|
|
Student Handouts:
|
| ||||
|
|
|
Related Tips & Articles:
|
|
| ||||||
|
| |||||
