Appropriate eye and personal protective equipment must be worn. Machines have moving parts that may cause entanglement. All loose clothing, jewelry and long hair must be secured.
OPERATE ONLY AFTER YOU'VE RECIEVED INSTRUCTION & TEACHER'S PERMISSION TO USE THIS TOOL.
BE SURE YOUR TEACHER HAS CHECKED YOUR UNDERSTANDING OF PROPER PRACTICE.
OPERATE ONLY AFTER YOU'VE RECIEVED INSTRUCTION & TEACHER'S PERMISSION TO USE THIS TOOL.
BE SURE YOUR TEACHER HAS CHECKED YOUR UNDERSTANDING OF PROPER PRACTICE.
Router / Shaper
1. Be sure to have the instructors approval before operating the machine.
2. Always wear eye protection.
3. When possible, mount the cutter so that most of the cutting will be performed on the lower part of the edge. Any unused part of the cutter should be below the table.
4. An approved lock washer must be located directly under the spindle nut. The nut must be set tight.
5. Use the fence for all straight line shaping cuts. Be certain it is properly adjusted and securely locked in place.
6. Use guards, feather boards and hold-down devices whenever possible.
7. Maintain a 4” inch margin of safety when using the fence or miter gauge, and a 6” inch margin of safety when using depth collars. If the part is too small to allow this margin, design and build a special holder or push board.
8. Cut only new stock that is straight, true and free of splits, checks and knots.
9. Roll the spindle over by hand to check clearance of complicated settings. Snap the switch on and off quickly to check rotation of the cutter. Be certain the direction of feed is correct.
10.Have your instructor to inspect the setup. Inform him of the direction and order of feed you plan to use.
11.Make a trial cut on an extra piece of stock that is the same thickness as you project.
12.Always lock or unplug the machine when mounting bits or making major adjustments.
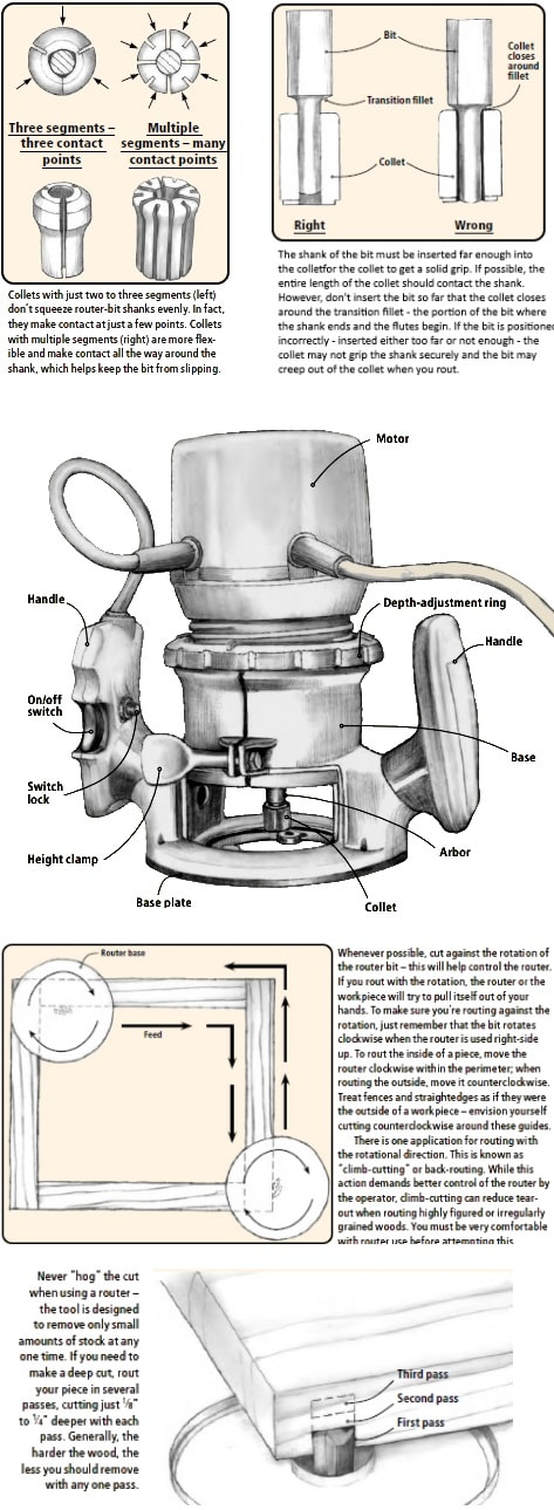
13.The bit must be securely mounted in the chuck to a depth of atleast 1/2” inch. The base must be tight. (Handheld)
14.Be certain that the motor is properly grounded. (Handheld)
15.Be certain the work is securely clamped and will remain stationary during the routing operation. (Handheld)
16.Place the router base on the work or template, with the bit clearof the wood before turning on the power. Hold it firmly when turning on the motor to overcome starting torque. (Handheld)
17.Hold the router in both hands and feed it smoothly through the cut in the proper direction. (Handheld)
18.When the cut is complete, turn off the motor. Do not lift the machine from the work until the motor has stopped. (Handheld)
2. Always wear eye protection.
3. When possible, mount the cutter so that most of the cutting will be performed on the lower part of the edge. Any unused part of the cutter should be below the table.
4. An approved lock washer must be located directly under the spindle nut. The nut must be set tight.
5. Use the fence for all straight line shaping cuts. Be certain it is properly adjusted and securely locked in place.
6. Use guards, feather boards and hold-down devices whenever possible.
7. Maintain a 4” inch margin of safety when using the fence or miter gauge, and a 6” inch margin of safety when using depth collars. If the part is too small to allow this margin, design and build a special holder or push board.
8. Cut only new stock that is straight, true and free of splits, checks and knots.
9. Roll the spindle over by hand to check clearance of complicated settings. Snap the switch on and off quickly to check rotation of the cutter. Be certain the direction of feed is correct.
10.Have your instructor to inspect the setup. Inform him of the direction and order of feed you plan to use.
11.Make a trial cut on an extra piece of stock that is the same thickness as you project.
12.Always lock or unplug the machine when mounting bits or making major adjustments.
13.The bit must be securely mounted in the chuck to a depth of atleast 1/2” inch. The base must be tight. (Handheld)
14.Be certain that the motor is properly grounded. (Handheld)
15.Be certain the work is securely clamped and will remain stationary during the routing operation. (Handheld)
16.Place the router base on the work or template, with the bit clearof the wood before turning on the power. Hold it firmly when turning on the motor to overcome starting torque. (Handheld)
17.Hold the router in both hands and feed it smoothly through the cut in the proper direction. (Handheld)
18.When the cut is complete, turn off the motor. Do not lift the machine from the work until the motor has stopped. (Handheld)
|
|
|
Student Handouts:
|
| ||||
Related Tips & Articles:
|
|
| ||||||
|
|
| ||||||
|
|
| ||||||
|
|
| ||||||
|
|
| ||||||
|
| |||||
