Appropriate eye and personal protective equipment must be worn. Machines have moving parts that may cause entanglement. All loose clothing, jewelry and long hair must be secured.
OPERATE ONLY AFTER YOU'VE RECIEVED INSTRUCTION & TEACHER'S PERMISSION TO USE THIS TOOL.
BE SURE YOUR TEACHER HAS CHECKED YOUR UNDERSTANDING OF PROPER PRACTICE.
OPERATE ONLY AFTER YOU'VE RECIEVED INSTRUCTION & TEACHER'S PERMISSION TO USE THIS TOOL.
BE SURE YOUR TEACHER HAS CHECKED YOUR UNDERSTANDING OF PROPER PRACTICE.
Power Miter Box / Circular Saw
. The table on this machine can be cut so often that it no longer gives safe support to the work.
2. The guard sections can easily be checked for the proper machine operation before starting to use the machine.
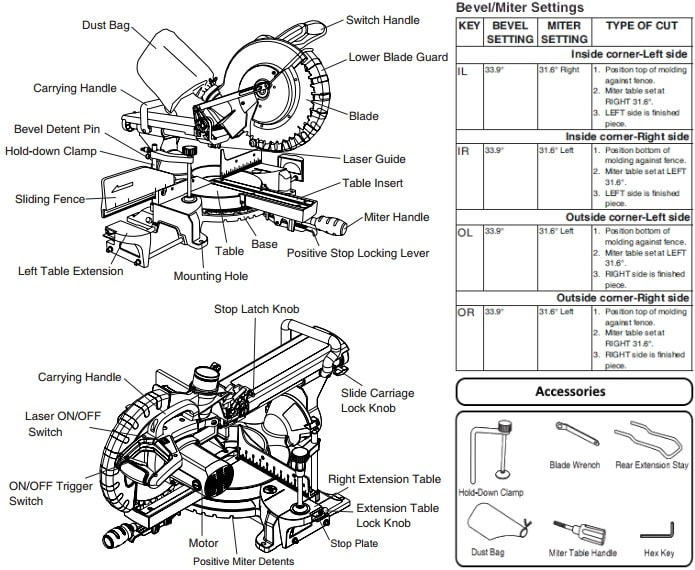
3. The power miter box has an electric stop built into the trigger switch.
4. The majority of the stock should be on the left hand side of the blade.
5. Material should be held firmly against the fence with the left hand during operation.
6. To adjust the angle of the cutter head, we unlock the handle and pinch the tab.
7. It is important to clamp the power miter box to a secure table prior to operation with “C” clamps.
8. Prior to operation we must adjust the sawdust spout to an appropriate direction, away from co-workers.
9. Always use a sharp blade with plenty of set.
10. Always unplug the machine to change blades or make major adjustments.
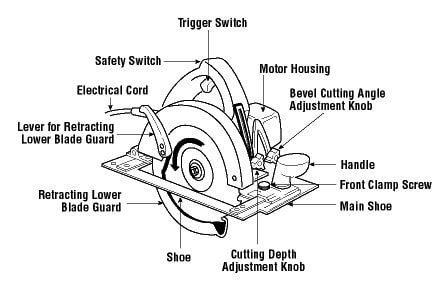
11. Large saws will have two handles. Keep both hands on them during the cutting operation. Small saws should also be guided with both hands when possible. (Circular Saw)
12. Check the base and angle adjustment to be sure they are tight. Plug in the cord to a grounded outlet and be sure it will not become fouled in the work. (Circular Saw)
13. Adjust the depth of the cut to the thickness of the stock,and add about 1/8” inch. (Circular Saw)
14. Always place the saw base on the stock, with the blade clear, before turning on the switch. (Circular Saw)
15. During the cut, stand to one side of the cutting line.
16. Be careful not to cut into the bench, sawhorse, or other supporting device. (Circular Saw)
17. Thin materials should be supported on benches. Small pieces should be clamped in a vice or onto a bench top or sawhorse.
18. Stock must be supported in such a way that the kerf will not close and bind the blade during the cut or at the end of the cut.
2. The guard sections can easily be checked for the proper machine operation before starting to use the machine.
3. The power miter box has an electric stop built into the trigger switch.
4. The majority of the stock should be on the left hand side of the blade.
5. Material should be held firmly against the fence with the left hand during operation.
6. To adjust the angle of the cutter head, we unlock the handle and pinch the tab.
7. It is important to clamp the power miter box to a secure table prior to operation with “C” clamps.
8. Prior to operation we must adjust the sawdust spout to an appropriate direction, away from co-workers.
9. Always use a sharp blade with plenty of set.
10. Always unplug the machine to change blades or make major adjustments.
11. Large saws will have two handles. Keep both hands on them during the cutting operation. Small saws should also be guided with both hands when possible. (Circular Saw)
12. Check the base and angle adjustment to be sure they are tight. Plug in the cord to a grounded outlet and be sure it will not become fouled in the work. (Circular Saw)
13. Adjust the depth of the cut to the thickness of the stock,and add about 1/8” inch. (Circular Saw)
14. Always place the saw base on the stock, with the blade clear, before turning on the switch. (Circular Saw)
15. During the cut, stand to one side of the cutting line.
16. Be careful not to cut into the bench, sawhorse, or other supporting device. (Circular Saw)
17. Thin materials should be supported on benches. Small pieces should be clamped in a vice or onto a bench top or sawhorse.
18. Stock must be supported in such a way that the kerf will not close and bind the blade during the cut or at the end of the cut.
|
|
|
Student Handouts:
|
| ||||

|

|
|
|
|
Related Tips & Articles:
|
|
| ||||||
