Appropriate eye and personal protective equipment must be worn. Machines have moving parts that may cause entanglement. All loose clothing, jewelry and long hair must be secured.
OPERATE ONLY AFTER YOU'VE RECIEVED INSTRUCTION & TEACHER'S PERMISSION TO USE THIS TOOL.
BE SURE YOUR TEACHER HAS CHECKED YOUR UNDERSTANDING OF PROPER PRACTICE.
OPERATE ONLY AFTER YOU'VE RECIEVED INSTRUCTION & TEACHER'S PERMISSION TO USE THIS TOOL.
BE SURE YOUR TEACHER HAS CHECKED YOUR UNDERSTANDING OF PROPER PRACTICE.
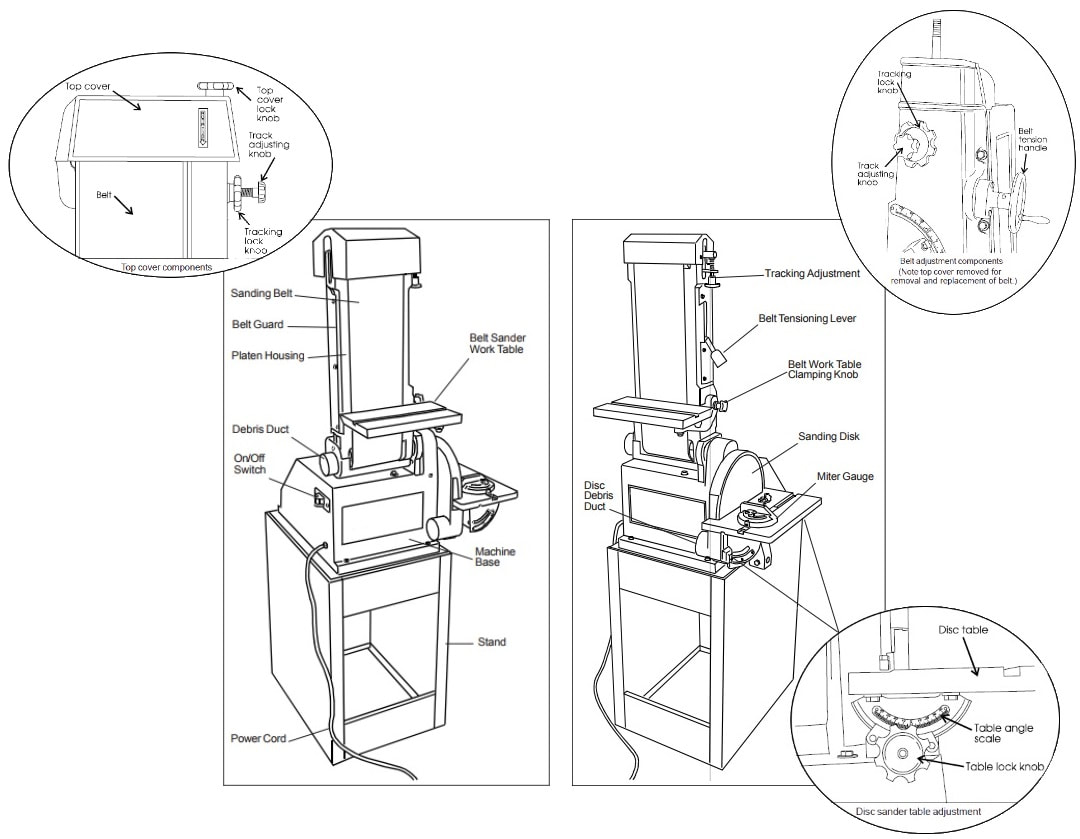
Sanding Machines
1. Any and all adjustments should be done before beginning work. Power source must be disconnected/locked out prior to making any adjustments.
2. Be certain the belt or disc is correctly mounted. The belt must track in the center of the drums and platen. Do not operate the disc sander if the abrasive paper is loose.
3. Check the guards and table adjustments to see that they are in the correct position and locked securely in place.
4. Use the table, fence and other guides to control the position of the work, whenever possible.
5. Small or irregular shaped pieces should be held in a hand clamp, or a special jig or fixture.
6. When sanding the end grain of narrow pieces on the belt sander, always support the work against the table.
7. Sand only on the side of the disc sander that is moving toward the table. Move work along this surface so it will not burn.
8. Always use a pad or push block when sanding thin pieces on the belt sander.
9. Do not use power sander to form and shape parts when the operations could be better performed on the machines.
10. Sand only clean new wood. Do not sand work that has excess glue or finish on the surface. These materials will load and foul the abrasive.
11. If belt tracks incorrectly, shut off immediately and notify teacher.
12. Clean belt as necessary.
13. Apply light pressure against the belt, as heavy pressure will burn the material. Move stock evenly and steadily over the entire width of the belt.
14. In the event of a jam or malfunction, remove yourself from the danger, appropriately disable the machine and immediately notify the teacher.
15. If for any reason you are not sure, or if you feel that the operation you are about to perform is unsafe, ask your teacher for assistance.
|
|
|
Student Handouts:
|
| ||||

|
|
|
|
Related Tips & Articles:
|
|
| ||||||
|
|
| ||||||
|
|
| ||||||
